

Have a Unity Oculus VR project? Need to auto run on boot? Check it out!
In this article, we’ll show you how to modify your application to enable a Quest or Go app to load a specific app on restart (or at boot) by modifying a few manifest settings and creating a custom Broadcast receiver class in Java to launch your app.
In general, a Oculus VR app on the Go or Quest is just an android application running on an Android device. Because of this, and Unity’s ability to allow developers to modify the Android Manifest file as well as export their Unity projects to an editable Android project, modifying your app to tell the system to load in a certain way only required 2 modifications to be made:
- Adding a line to your manifest to trigger a custom intent on boot or restart
- Adding a receiver to the Unity project to capture and launch on boot the build
Assuming that you have already the project, lets parse a few settings. Be sure to have the Android Platform selected, or switch over to it.
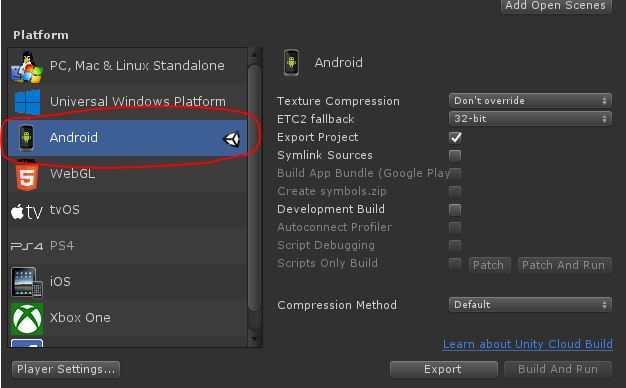
Once the change has been made, ensure that you check the tick-box for Export Project, under the Build Settings.
Now, go to Player Settings and lets make sure we have everything set-up properly to build to the quest. First on the list is to check the XR Settings and make sure that Oculus is added to the Virtual Reality SDK. Because we’re going to make changes to the manifest, do not check V2 Signing Quest at this step. 
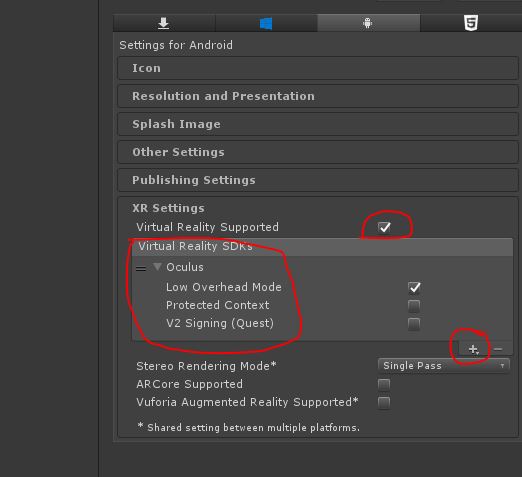
While we are here, we’re also going to jump over to Other Settings and change the minimum API level to 25 (on the moment of creating this article) to avoid any build errors later. We’ll also remove Vulkan from the Graphics API settings according to Oculus documentation.
Once everything is done, we can continue with the export. Just got to Build Settings and click export. You’ll be asked for a location to make the export.
Sit and wait for unity to export the project to Android Studio.
Now that the project has been exported, we’ll open Android Studio and we’re going to assume that you already have a Quest device set-up in developer mode.
When you’ll receive a choice for Android SDK, check to use Unity Android SDK and not Android Studio SDK as the last one might have different versions for the build tools.
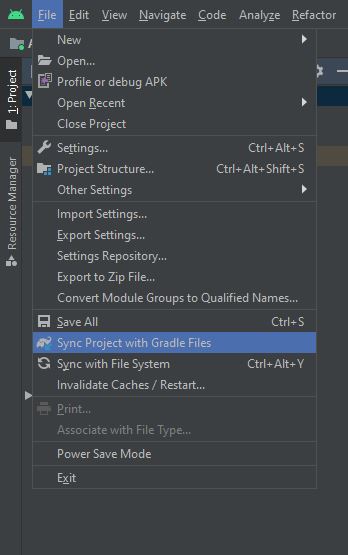
The first thing that needs to be done, after Android Studio has been opened, is to sync the build, just to ensure that everything is set-up correctly.
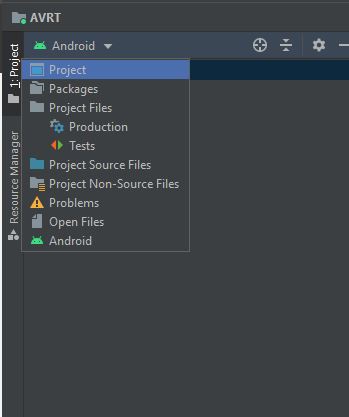
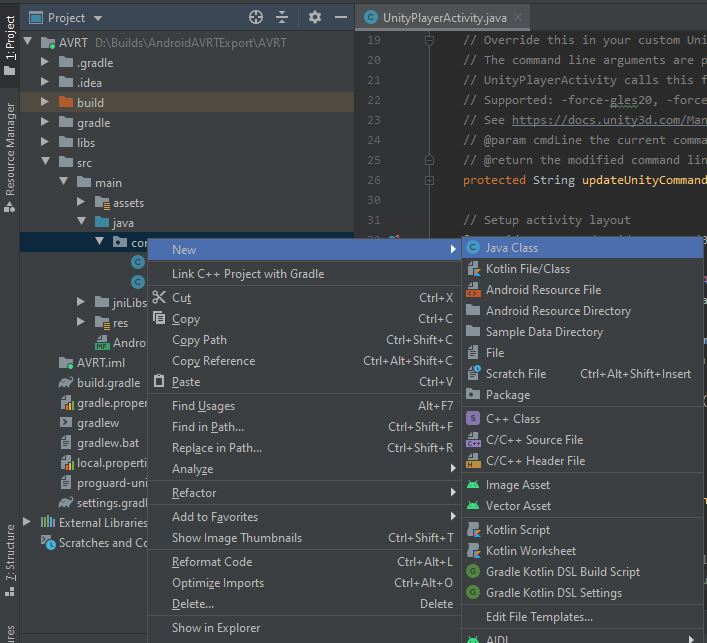
Once we finished the sync, change the project view from Android to Project. This can be done by clicking onto the Android dropdown under the Project Tab in Android Studio.
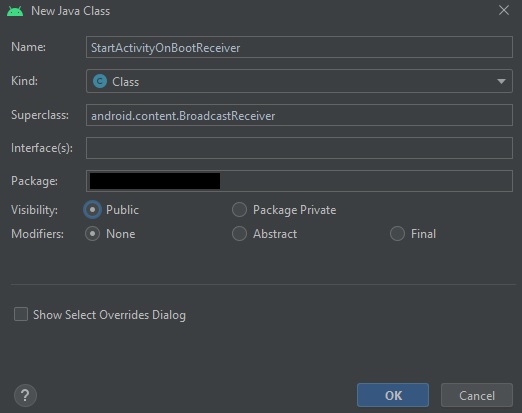
If all worked well, you need to create a new class called StartActivityOnBootReceiver.java
Add in the name and be sure to type in the superclass. This is an important step: android.content.BroadcastReceiver.
Now, open up the class you just created and we need to override a method called onReceive. The code inside the class should look like:
public class StartActivityOnBootReceiver extends BroadcastReceiver {
    @Override
    public void onReceive(Context context, Intent intent) {
        Intent i = new Intent(context, UnityPlayerActivity.class);
        context.startActivity(i);
    }
}
As you can see, this code extends BroadcastReceiver, which Android runs at certain points during an application lifespan. We’re going to modify the Unity Manifest to trigger this block of code when certain events occur. We’ll also pass it some information when this happens and tell it to play our application.
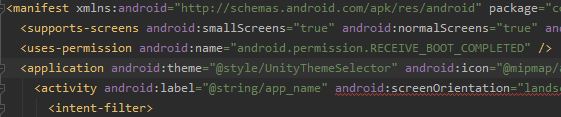
Now that we have the class in place, we need to make some changes over our Manifest. Find your AndroidManifest.xml file and open in up in Android Studio. We need to make several modifications.
<uses-permission android:name="android.permission.RECEIVE_BOOT_COMPLETED" />
Check snip for info about location in the file.
The second change is to add the receiver:
<receiver android:name=".StartActivityOnBootReceiver" android:permission="android.permission.RECEIVE_BOOT_COMPLETED" android:enabled="true" android:exported="true">
  <intent-filter>
    <action android:name="android.intent.action.BOOT_COMPLETED" />
    <action android:name="android.intent.action.QUICKBOOT_POWERON" />
    <category android:name="android.intent.category.DEFAULT" />
  </intent-filter>
</receiver>
Along with receiving the event, the change above will allow our application to act on an event. When received, it will call out to the StartActivityOnBootReceiver class. In this case, when the devices is booted, we’re capturing the event and telling our application to launch our file.

You’re almost there! Now, resync the project, just to make sure you don’t have any errors, just as we did before.
You can now start the build process and plug in the Oculus headset. Push the apk over adb or directly through Android Studio and let’s test it out.
Please keep in mind, that the application has to be started at least one time after install in order for the Broadcast Receiver to work!
We were glad to help you! Tell us the comments below how did our article helped you!
Please give us a like on Facebook and share out page so that we can maintain our work.
Leave a Reply
You must be logged in to post a comment.