
Creating Android Wear Games from Unity
Here we will help you and show you how you can make any unity game to be able to run on Android wear.
To get started, let’s try and focus a bit on what Android wear is.
Android Wear is a version of Google’s Android operating system designed for smartwatches and other wearables. By pairing with mobile phones running Android version 4.3 or newer, or iOS version 8.2 or newer with limited support from Google’s pairing application, Android Wear integrates Google Now technology and mobile notifications into a smartwatch form factor. It also adds the ability to download applications from the Google Play Store.
So if your smartwatch has an Android Wear operating system, you can install any .apk game/app on it. The trick is how to make Google Play store to be able to install the application into your phone so that after to be installed onto your watch.Let’s find out!!
As you all know, smartwatches are coming in different shapes and sizes. But this is not all, like smartphones, they have different screen resolutions. Your game needs to perfectly fit any of those shapes, even if it’s square, round or chin.
Your first task is creating a game on Android with the help of Unity 3D Engine. After you have your game completed, you can begin the process of deploying it to your smartwatch. This can be achieved by enabling the Developer Options on your smartwatch, activating either USB debugging if the watch supports direct connection or Bluetooth debugging and connecting your watch to the PC with the help of your smartphone or not. You can later deploy via ADB your apk to install it on the smartwatch.
- Preparing Unity Settings and scenes!
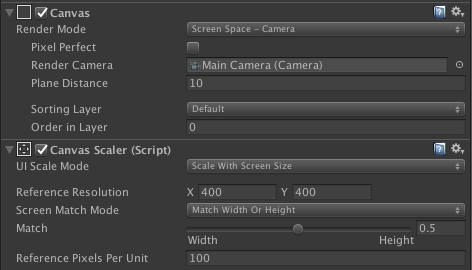
As you know Android Wear resolutions are low so let’s start by making the Canvas to have a reference resolution of 400×400 and I would suggest to use the render mode set to Screen Space – Camera, like displayed bellow.
Let us explain why those settings are a must. This is the layout that you must be aware of:
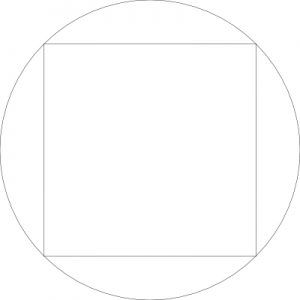
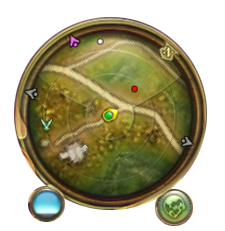
Boxed layout, our take on it.
You get approved faster if you have all your UI elements inside the square
So you have to accomplish this just to be certain that any UI object is not outside the box. If any of the UI elements is sitting outside the boxed layout, the app/game won’t get approved for Android Wear!
Next be sure to add the following line into a singleton script (if you don’t know what a singleton scrip is, click here):
Screen.sleepTimeout = (int)0f;
or
Screen.sleepTimeout = SleepTimeout.NeverSleep;
This will prevent the game to have the screen dimmed while playing.
If your game runs on Android wear smooth without any issues by deploying it on the device how we talked in the beginning, we can now work on the process to create an installer for Google Play Store.
But be aware that any plugins such as Facebook connectivity or google play games services will not work on Android Wear until this point.
Let’s review what do we need to accomplish in order to have a complete build on store.
So now that the deployment was not impossibly difficult, and you now have the game on the wear, you need to make sure you are aware of:
- Orientation
It’s was now running on hardware, but the little wonky, because it tried to change orientation all the time. Even with everything totally still. This was solved with a script that set the orientation to portrait. While researching this we found out that this was solved before, and to a greater extent. Someone had the a problem with the Motorola 360, and it that particular device was 90 degrees rotated compared to the “correct” way. So we have added that into the script as well.
- Optimization
Nice, but a little laggy. Time to kill darlings, because you have to. By enabling and disabling different features we managed to get the frame rate up. Fastest on render setting did a little. Particles was also expensive so they had to go, or changed to sprites. And to our surprise, removing the music and just keeping one sound effect from the ball made a huge jump. Something like 10fps. Now this is a 2d game, that is kept intentionally clean. 3D games might require other tricks.
- Publishing on the app store
To get your app into the google play store you need to upload it with an accompany app that runs on the mobile device. this is because there is no way to uninstall apps on a wear. This is not supported by Unity so we exported the game from Unity to an Android Studio project. Then created a new android studio project for a wear and then we did like dr Frankenstein and added the pieces together in an unholy way. Pro-tip, don’t use minify it makes Unity crash. - Layouting
Wear uses something called a boxed layout, like the one we have shown you. Think of it as a circle with a box inside it. Everything should be inside the box. This is because the devices with chin, aka flat tire, aka why would they do this? I don’t know, probably something technical and monetary. What I do know is that if you use this: graphics as a background in your project and then and put all your UI elements inside it the square, you are more then safe.
- Long press to exit.
Now that the game is ready, just upload and release right? Nope, since we took over the whole screen and disabled the swipe to go back. Well Unity does that for us, for plain vanilla Android (without added Unity) you can just add a view that does all that. In Unity it was a bit more work. But we solved it all by subclassing the unityplayer and add the view from Java. Have a look in the file called UnityPlayerActivity.java and you will se the GestureDetector instantiation and creation. This we would not have found if the kind people at google that does the testing on device (there is, and it is awesome) hadn’t spotted this, my test device has a button that can go back.
After you are familiar to what is required for your project to gain life, we need to create an Android Project export from your Unity Project. Before creating the Android Project export please ensure that you meet the followings:
- check if your build settings are set to Android
- be sure to have set a bundle ID
- be sure that the game is set to run on both ARM and x86. To check, go to File->Build Settings -> Other Settings from inspector and set the Device Filter to FAT (ARMv7+x86)
- be sure that on Build Settings the development build is not ticked and all your scenes are added into the Build Settings – Scenes in build
- you are not required to use a keystore file to sign your app/game from Unity. This can be accomplished by creating a keystore file within Android Studio
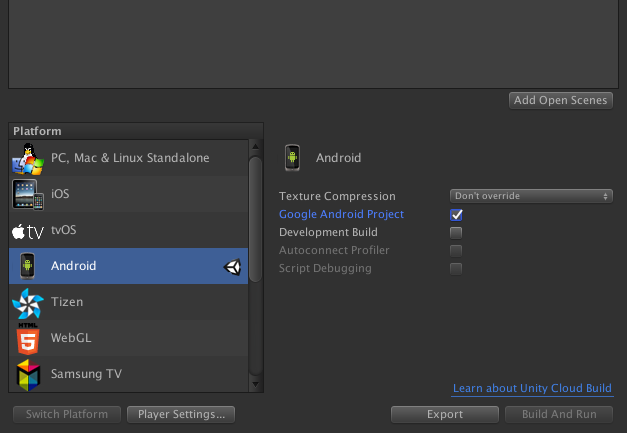
Now, tick the Google Android Project button, and let the editor export the pack.
All your work with Unity is over.
- Getting Android Studio up and running
From this point is up to you. Since android wear applications and games are required to have a smartphone app installed in order to work, you can also create with the same bundle ID a Google Android Project export for smartphones as well, but this time don’t use the resolution reference for smartwatches.
So open Android Studio app and start a new project. Enter the application name and as for the Bundle ID use the SAME bundle ID as used in Unity, and click Next.
At this point you need to check both Phone and Tablet and Wear with the minimum SDK of android Wear of API 20 – Android 4.4W. Use the Empty Activity and get to finish.
You will have a new project opened with both Empty Activities of phone and wear.
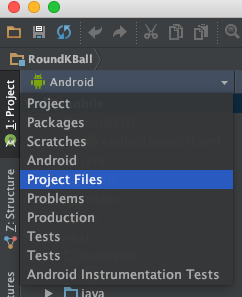
Set your project view from Android to Project Files like displayed bellow:
Now let’s import the Google Android Project export to Android Studio. To do so just go to File -> new -> import module and import it.
You will see that beside the mobile and wear project files, you have a new one. You have to disable this new folder in project files from the project structure. RightClick on it and select Open Module Settings and click on the – (minus) sign after selecting it from that list. Also you need to delete it from the Run Configurations. To do so, you need to go to Run -> Edit Configurations and remove the same as before.
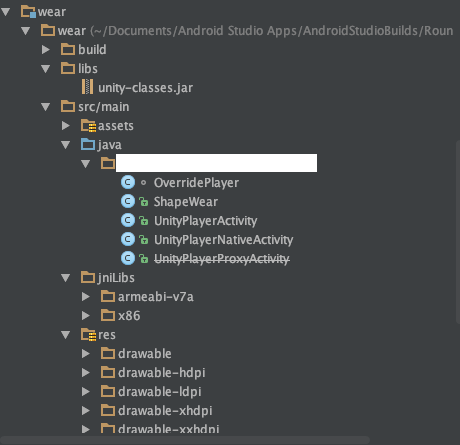
Next Copy the followings from your imported module folder to the Wear folder:
- libs folder
- from src/main copy assets
- from src/main java. Before copying it, please delete the folder contain first from your wear module (DO NOT USE SAFE DELETE)
- from src/main jniLibs and res.
The wear structure should be like in the picture:
Inside the wear module, check and edit the Android Manifest. Here include all your applications permissions and features. In addition to all you have make sure you set:
<uses-feature android:name="android.hardware.type.watch" />
<uses-permission android:name="android.permission.WAKE_LOCK" />
Don’t forget to set the activity properly:
<activity
    android:name="YOUR_BUNDLE_ID.UnityPlayerActivity"
Next Create a new java file, name it after the class and copy the next source code into it, BUT CHANGE the package with your bundle id:
package YOUR_BUNDLE_ID;
import android.app.Activity;
import android.content.Context;
import android.graphics.Point;
import android.view.Display;
import android.view.View;
import android.view.WindowInsets;
import android.view.WindowManager;
public class ShapeWear {
    public static enum ScreenShape {ROUND, MOTO_ROUND, OTHER_ROUND,  RECTANGLE, UNDETECTED}
    private static int screenWidthPX = 0;
    private static int screenHeightPX = 0;
    private static OnSizeChangeListener onSizeChangeListener;
    private static ScreenShape shape = ScreenShape.UNDETECTED;
    private static OnShapeChangeListener onShapeChangeListener;
    /**
     * Initialized to determine screen shape
     * @param view
     */
    private static void initShapeDetection(View view){
        view.setOnApplyWindowInsetsListener(new View.OnApplyWindowInsetsListener() {
            @Override
            public WindowInsets onApplyWindowInsets(View v, WindowInsets insets) {
                if (insets.isRound()) {
                    shape = ScreenShape.ROUND;
                    if(screenWidthPX == 320 && screenHeightPX == 290) {
                        shape = ScreenShape.MOTO_ROUND;
                    }
                    else if(screenWidthPX != screenHeightPX ) {
                        shape = ScreenShape.OTHER_ROUND;
                    }
                    if(screenWidthPX == 360 && screenHeightPX == 326) {
                        shape = ScreenShape.OTHER_ROUND;
                    }
                } else {
                    shape = ScreenShape.RECTANGLE;
                }
                if(onShapeChangeListener != null){
                    onShapeChangeListener.shapeDetected(getShape());
                }
                return insets;
            }
        });
    }
    /**
     * Initialized at any moment of app life cycle to determine screen shape and size
     * @param activity
     */
    public static void initShapeWear(Activity activity){
        WindowManager wm = (WindowManager) activity.getSystemService(Context.WINDOW_SERVICE);
        getScreenSize(wm);
        initShapeDetection(activity.getWindow().getDecorView().findViewById(android.R.id.content));
    }
    /**
     * Initialized at any moment of app life cycle to determine screen shape and size
     * @param context
     */
    public static void initShapeWear(Context context){
        WindowManager wm = (WindowManager) context.getSystemService(Context.WINDOW_SERVICE);
        getScreenSize(wm);
        initShapeDetection(((Activity) context).getWindow().getDecorView().findViewById(android.R.id.content));
    }
    private static void getScreenSize(WindowManager wm) {
        Display display = wm.getDefaultDisplay();
        Point size = new Point();
        display.getSize(size);
        screenWidthPX = size.x;
        screenHeightPX = size.y;
        if(onSizeChangeListener != null){
            onSizeChangeListener.sizeDetected(screenWidthPX, screenHeightPX);
        }
    }
    /**
     * Method used to get most common (for now) parameter, is screen is round or not. Will throw an Exception is it is not detected.
     * @return boolean is screen is round or not
     * @throws ScreenShapeNotDetectedException
     * @deprecated use {@link #getShape()} instead, as it allows to handle all shapes correctly, and Google specifies that more shapes can be introduced in the future.
     */
    @Deprecated
    public static boolean isRound() throws ScreenShapeNotDetectedException {
        if(shape == null || shape.equals(ScreenShape.UNDETECTED)){
            throw new ScreenShapeNotDetectedException("ShapeWear still doesn't have correct screen shape at this point, subscribe to OnShapeChangeListener or call this method later on. Also you can call getShape() to get String representation, will return SHAPE_UNSURE if not specified.");
        } else if (shape.equals(ScreenShape.ROUND)){
            return true;
        } else {
            return false;
        }
    }
    /**
     * Safe-proof method, but will return ScreenShape.UNDETECTED instead of throwing Exception.
     * @return String name of screen type
     */
    public static ScreenShape getShape(){
        return shape;
    }
    public static int getScreenWidthPX() {
        return screenWidthPX;
    }
    public static int getScreenHeightPX() {
        return screenHeightPX;
    }
    public static OnShapeChangeListener getOnShapeChangeListener() {
        return onShapeChangeListener;
    }
    public static void setOnShapeChangeListener(OnShapeChangeListener onShapeChangeListener) {
        ShapeWear.onShapeChangeListener = onShapeChangeListener;
        if(!getShape().equals(ScreenShape.UNDETECTED) && ShapeWear.onShapeChangeListener != null){
            ShapeWear.onShapeChangeListener.shapeDetected(getShape());
        }
    }
    public static void setOnSizeChangeListener(OnSizeChangeListener onSizeChangeListener) {
        ShapeWear.onSizeChangeListener = onSizeChangeListener;
        if(ShapeWear.onSizeChangeListener != null && screenWidthPX != 0 && screenHeightPX != 0){
            ShapeWear.onSizeChangeListener.sizeDetected(screenWidthPX, screenHeightPX);
        }
    }
    public interface OnShapeChangeListener {
        void shapeDetected(ScreenShape screenShape);
    }
    public interface OnSizeChangeListener {
        void sizeDetected(int widthPx, int heightPx);
    }
    public static class ScreenShapeNotDetectedException extends Exception {
        public ScreenShapeNotDetectedException() {
        }
        public ScreenShapeNotDetectedException(String detailMessage) {
            super(detailMessage);
        }
    }
}
Next go to UnityPlayerActivity.java and change the followings:
- Change the onCreate function with:
protected UnityPlayer mUnityPlayer; // don’t change the name of this variable; referenced from native code
// Setup activity layout
@Override protected void onCreate (Bundle savedInstanceState)
{
   requestWindowFeature(Window.FEATURE_NO_TITLE);
   super.onCreate(savedInstanceState);
   getWindow().setFormat(PixelFormat.RGBX_8888); // <--- This makes xperia play happy
   mUnityPlayer = new UnityPlayer(this);
   setContentView(mUnityPlayer);
   mUnityPlayer.requestFocus();
   getWindow().addFlags(WindowManager.LayoutParams.FLAG_KEEP_SCREEN_ON);
   ShapeWear.setOnShapeChangeListener(new ShapeWear.OnShapeChangeListener() {
      @Override
      public void shapeDetected(ShapeWear.ScreenShape screenShape) {
         //There is fine.
         if(screenShape ==ShapeWear.ScreenShape.OTHER_ROUND )
         {
            setRequestedOrientation(ActivityInfo.SCREEN_ORIENTATION_PORTRAIT);
            System.out.println("ActivityInfo.SCREEN_ORIENTATION_PORTRAIT");
         }
         else if(screenShape ==ShapeWear.ScreenShape.MOTO_ROUND )
         {
            setRequestedOrientation(ActivityInfo.SCREEN_ORIENTATION_PORTRAIT);
            System.out.println("ActivityInfo.SCREEN_ORIENTATION_PORTRAIT");
         }
         else
         {
            setRequestedOrientation(ActivityInfo.SCREEN_ORIENTATION_PORTRAIT);
            System.out.println("ActivityInfo.SCREEN_ORIENTATION_PORTRAIT");
         }
      }
   });
   ShapeWear.setOnSizeChangeListener(new ShapeWear.OnSizeChangeListener() {
      @Override
      public void sizeDetected(int widthPx, int heightPx) {
      }
   });
   ShapeWear.initShapeWear(this);
}
- Also add the following class beside the UnityPlayerActivity into UnityPlayerActivity.java
class OverridePlayer extends UnityPlayer {
   private DismissOverlayView mDismissOverlay;
   private GestureDetector mDetector;
   public OverridePlayer(ContextWrapper contextWrapper)
   {
      super(contextWrapper);
      mDismissOverlay = new DismissOverlayView(contextWrapper);
      addView(mDismissOverlay);
      mDismissOverlay.setIntroText("Longpress to exit");
      mDismissOverlay.showIntroIfNecessary();
      // Configure a gesture detector
      mDetector = new GestureDetector(contextWrapper, new GestureDetector.SimpleOnGestureListener() {
         public void onLongPress(MotionEvent ev) {
            mDismissOverlay.show();
         }
      });
   }
   @Override  public boolean onTouchEvent(MotionEvent motionEvent) {
      return mDetector.onTouchEvent(motionEvent) || this.injectEvent(motionEvent);
   }
}
- Also I have altered the UnityPlayerNativeActivity
public class UnityPlayerNativeActivity extends NativeActivity
{
   @Override protected void onCreate (Bundle savedInstanceState)
   {
      Log.w("Unity", "UnityPlayerNativeActivity has been deprecated, please update your AndroidManifest to use UnityPlayerActivity instead");
      super.onCreate(savedInstanceState);
   }
}
- In the wear module search for build.gradle file and add the folling dependency
provided files('libs/unity-classes.jar')
Now for the mobile part, go to the mobile module, and open build.gradle from it. You have to be sure that the following dependencies are set:
wearApp project(':wear')
compile 'com.google.android.gms:play-services:10.0.1'
compile 'com.android.support:appcompat-v7:25.1.0'
testCompile 'junit:junit:4.12'
If not, please add them.
Also now is the difference. If you want to have the app on smartphone as well, please repeat de process again now for the phone by importing the Unity Google Android export project for smartphones. Note that you have to delete the old imported module before importing the new one.
Tip: If your game does not build due to max dependencies issue, you can set the build to use multidex by changing the build.gradle files in both modules and adding the followings to them:
buildTypes {
    release {
        minifyEnabled false
        proguardFiles getDefaultProguardFile('proguard-android.txt'), 'proguard-rules.pro'
        multiDexEnabled true
    }
    debug {
        multiDexEnabled true
    }
}
Please note that ShapeWear has it’s own license and can be found here.
We were glad to help you! Tell us the comments below how did our article helped you!
Please give us a like on Facebook and share out page so that we can maintain our work.

Leave a Reply
You must be logged in to post a comment.